Tuesday, February 11, 2014

Tutorial - How to Make a Drawstring Bag

First, Gratuitious Darling Grandson Picture!  Here he is after nap time sharing the Birthday Cookie Bouquet with his Mama.


I was looking on the internet on how to make a Drawstring Bag using both a serger and a sewing machine and I didn't find exactly what I was looking for so I decided to make one and take Step-by-Step pictures and put my own tutorial up on my blog.  So Here Goes!


Drawstring Bag Using Serger and Sewing Machine

All it takes is: 1 piece of fabric, 6 lines of serging, and 2 lines of sewing. Pretty Quick!

Materials:

12.5 x 26.5 inch piece of fabric, I used some 100% cotton print
Scissors
Thread
Hem Gauge or Ruler
Fray Check
1 yard Ribbon or Cord (1/4 to 5/8 inch wide)
Marking Pencil or Pen (or regular pen in a pinch)

Cutting mat (optional)
Rotary Cutter (optional)
Pinking Shears (optional)
Pony Beads (optional)

Step 1:  Remove Selvage Edge on Fabric if needed.


Step 2:  Cut Fabric to 12.5 inches by 26.5 inches - print on fabric should be bi-directional since we are going to fold it for the bag.


Step 3:  Serge both 12.5 inch edges.  Trim thread.


Step 4:  Make 4 notches on long edges of fabric.  Fold in half longway with right sides facing each other (or hamburger, if you know that term), and notch 1/2 inch in and 2.5 inces down from the serged edges.


Step 5:  Fold in 1/2 inch tabs at the top and pin out of the way for serging.


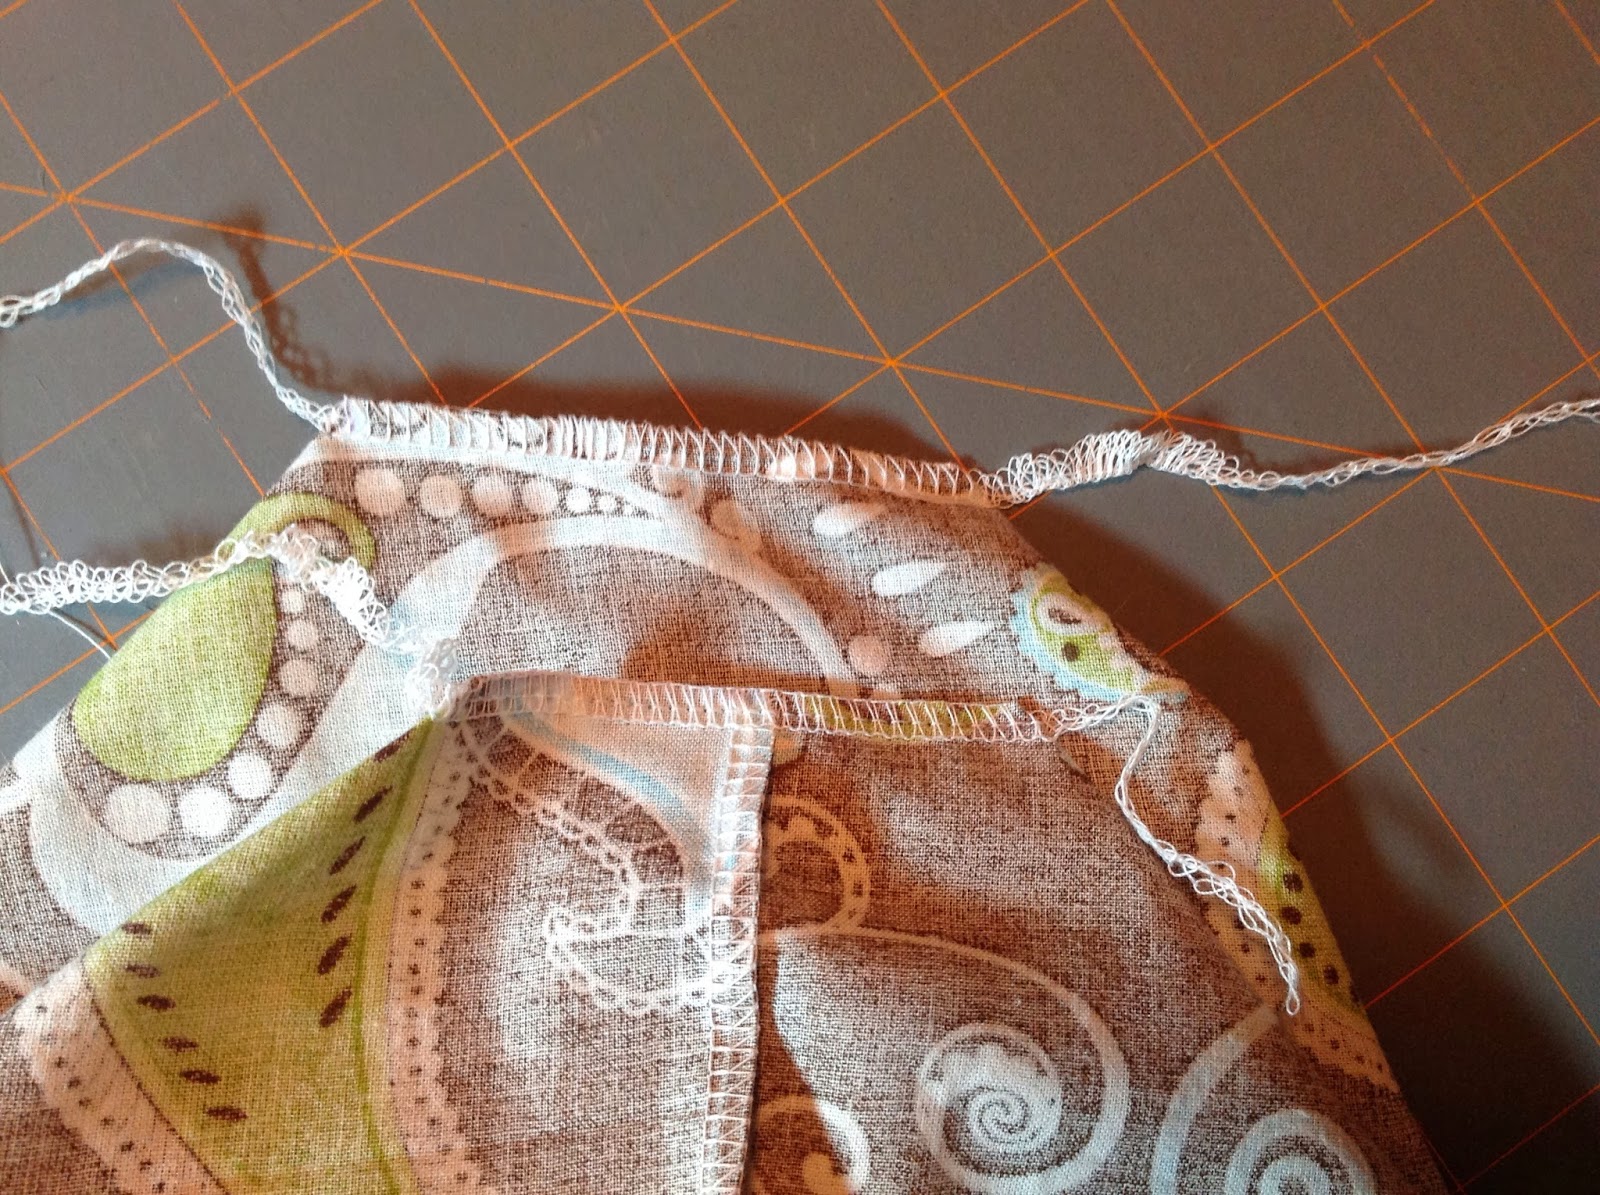
Step 6:  Serge the 2 long sides using the 1/2 inch mark on your serger.  Trim thread.


Step 7:  Pink edges of 4 tabs if desired (I got new Pinking Shears for Christmas from my Brother and Sister-in-law, so it was a good opportunity to use).

Step 8: Fold down 12.5 inch serged edge toward the wrong side about 3/8 to 1/2 inch keeping the tab tucked in, press or pin.  I pinned since my iron wasn't out and I'm a bit lazy.


Step 9:  Fold top edge over again toward wrong side so that fold from top edge to bottom folded edge is about 1 inch.  Press or pin.  I pinned.

This is how the sides look when both side "tubes" are pinned:


OR

Step 9 with Ribbon:  (I recently learned this on the internet so you save time threading the ribbon in later) Fold top edge over again toward wrong side with ribbon inserted in the "tube" and the top edge to the bottom folded edge is about 1 inch.  Make sure ribbon will slide back and forth (so you know you didn't pin it).


Step 10:  With sewing machine, and wrong side facing, sew along bottom edge of "tube" very close to the bottom fold.


Repeat Steps 9 and 10 with other side.

If you want a flat bag you are done other than applying Fray Check, turning right side out and pressing.
 

If you want a bag that stands up:

Step 11:  Fold bottom corner of bag into a point.  Draw a line (I used my hem gauge and used a three inch line.  Repeat for other bottom corner.


Step 12:  Serge with edge along the marked lines on each bottom corner.  Trim thread.


Step 13:  Apply Fray Check to each side of corner serging.  Make sure you place something under the item so the Fray Check doesn't get on your tabletop or cutting mat.


Step 14:  Apply Fray Check to top of serged edge near the drawstring "tubes".  Let dry.  Turn right side out.  Press for finished look.  Bag measures 10" x 3.5" x 7.  If unboxed bottom then 10" x 10".


Step 15:  Optional.  Thread Pony beads onto ribbon for decorative look. 


So again - 1 piece of fabric, 6 lines of serging, and 2 lines of sewing.  Pretty Quick!

Link to .PDF file


Wednesday, November 13, 2013

Day Trip to the "Painted Churches" - Part 2

First, a darling picture of my DGS learning to brush his teeth like a big boy from his daddy...


     Back in June, we went on a Day Trip just west of Katy, TX where we live to see "The Painted Churches".  The 2nd one we visited is called the "Pink Church".  It is the 1918 St. John the Baptist Catholic Church in Ammannsville, TX.  A Hurricane in 1909 leveled the original church but the current one is one of 20 Painted Churches in the State of Texas.


     We also visited the 1906 St. Mary's Catholic Church at High Hill, TX which also included some beautiful stained glass windows as well.  Much of it's interior was done by two San Antonio painters in 1912. 

     One of the things we found facinating was seeing some older painted areas waiting to be refreshed - it gives a sense of how much upkeep is required to keep these treasures so beautiful.


Here is the outside of the church and one of Mark in the entry way ringing the bell!  lol.

 
     We also visited the 1895 St. Mary's Catholic Church in Praha, TX which has the work of Swiss-born Gottfried Flurry who used a freehand Trompe L'oeil technique to paint this unique Gothic Revival Church.  I was really looking forward to seeing this church.  Unfortunately, the church was closed that day - it may have been because it was Memorial Day.  So we'll have to go back and visit it to see the inside.  We did get to visit the many shrines around the grounds to WWII Servicemen Members.  We really enjoyed finding such treasures so close to home.  It is a really fun day trip from the Houston or San Antonio or Austin areas.


     I was going through some old pictures and discovered several afghans I made in 2009 that I had not posted pictures.  These are some of my "Go To Patterns" when I want to make afghans.  First, the Lyn's Round Ripple Baby Afghan.  Here it is for Baby Samuel in Brite Green and Brite Blue using a "K" hook and Caron Simply Soft yarn and another in pale pink also using a "K" hook and "I Love This Yarn" (hard to find a pale French Pink...)for a new baby at my Mama's church.  This pattern is so fun and fast and the color combos are endless.


     The 3rd afghan was for my DSIL.  He is a big OU Sooner's fan (we have succeeded in getting him to be an OSU Alumni though!) so I made him an afghan called Simple Times in their "Crimson and Cream" that I had previously made for my son in Celtic colors.  This is a very beautiful stitched afghan and I especially like it in 2 striped colors.  I oversized it a bit since he is 6' 2".  I made it in Caron Simply Soft with a "K" hook.  It has a braided or cabled look and has worn and washed well.

Thursday, October 31, 2013

Craft - Tober

First, the Cute Baby Picture... My Favorite Pirate...Jake and the Neverland Pirates as played by DGS for Halloween...


What a cutie!!

I have been knitting and crocheting quite a bit, in fact, I having been reading as much as I usually do because I have been doing so much needlework.

Here is an adorable Giraffe Lovey.  I made him with yarn I already had in my stash (Score!).  I used Caron Simply Soft and Lion Brand Wool-Ease in the gold.  The only modification I used was to use Safety Eyes which I thought really stood out and I used a "J" hook for the blanket part since my last Lovey blanket was a little too small and the tension was too tight.  This was a great pattern and well worth the money and I actually made all the pieces twice except for the head and blanket so I can finish a second one quickly.  I will say there were a LOT of ends to sew in and stuffing the Giraffe Antlers was a pain in the Giraffe butt...lol.


I also completed some socks, one pair was a Mother's Day Gift, one pair is a Christmas Gift, and the other was supposed to be a gift but I struggled with the pattern for fit soooo they ended up being for me! (I mean, oh, too bad...).

The first pair was in a yarn I bought at a great yarn shop in La Grange, TX called The Quilted Skein in a lovey warm brown with some goreous highlights from Pagewood Farms in Denali SuperWash Merino/Nylon (80/20) called "Maple Leaf".  I ordered an awesome Wool Girl Yarn Club kit called "Earl Grey Tea" and used the sock pattern included in the kit called Bergamot by Jane Robbins (which is exclusive to the club I believe as it is not on Ravelry).  It was a really nice pattern and the pattern repeat was easy to memorize.  I used Addi Turbo 1.5 32" circulars and followed the pattern top-down until the foot where I reduced to 60 stitches from 64 since these were for my Mama and she has a narrow foot.  I kept the pattern in place for the 32 top-side and just reduced the number of stitches on the sole.  These flew off my needles, I would knit the pattern or the yarn again for sure.


The second pair are a VICE Paradigm sock yarn Merino/Nylon (80/20) in the Krazy colorway.  I was wanting to knit a pair of socks for ?? for Christmas and when I saw this colorway it just screamed ??.  I used Chiao Goo Red Lace Needles in 1.5 32" and I have to say these are my new favorite needles, perhaps even upsetting the reigning winner of Addi Turbos.  These were knit toe up with 64 stitches, a Fleegle heel, and a fun lace pattern at the top for interest.  I hope she likes them!  PS - her foot is a little bigger than mine so these are a bit loose in the picture.


The final pair of socks in today's post is Los Monos Locos (Crazy Monkeys) which is a toe-up version of the popular Cookie A Monkey Socks.  One of my resolutions for 2013 was to make the super popular Monkey socks by Cookie A.  I tried years ago, but wasn't experienced enough to "read" my knitting and just couldn't get the rhythm of the pattern repeat.  Flash forward to 2013...I LOVE this pattern repeat, I now know what all the fuss is about.  Plus they make crazy variegated colorways look amazing.  However, I probably re-made these socks at least 10 times.  I COULD NOT get fit.  I finally got it but I actually had to not re-use some of the yarn as I had worn it out from frogging and re-knitting!  Here is what I did (I have a narrow foot so that didn't help, but I understand other people have had trouble with fit as well). 


With US1.5 32" circular needle, cast on 24 (don't like pointy toe), after setup round, KFB, knit till 2 stitches left, KFB, K, repeat for 2nd half of round, K next round then repeat theses 2 rounds till 62 stitches (last round KFB at beginning of round only).  This puts only 1 stitch between increases rather than the traditional 2 and it lays flatter on the sides of the toes.  Use 32 stitches on 1st half of round for pattern stitch and 30 on sole side.  After 7 repeats of pattern, begin Fleegle heel, restart row 1 of pattern on front of sock after finishing heel with 64 stitches total. Begin this pattern repeat with increase to US2 32" circular and finish pattern repeat only on front of sock, then switch to pattern repeat in front and back of leg of sock.  I did 6 repeats of pattern then switch back to US1.5 32" circlulars and knit 10 rounds of twisted rib patten and bound off using a modified Jeny's Surprisingly Stretchy Bindoff. 

It turns out that that with all the re-knitting to get fit to go over the heel, etc. I got them about 1/2 inch too long in the foot for my DD, so I guess they have to be mine!  I picked up this beautiful colorway of Regia 4-ply (75 SW Wool/25 Nylon) Garden Effects by Kristin Nicholas in the Blue Thyme 3304 Colorway in Albuquerque at Village Wools on a business trip- it has more purple than blue though.  I loved knitting with this and love the socks as well, so much that I have cast-on with another sock yarn using this adapted pattern!

I'll finish up with some pictures of my Halloween Luminarias from last year...


Wednesday, June 12, 2013

Day Trip to the "Painted Churches"

First, the Cute Baby Pic!


DGS kickin' back watching Disney Movies!

We recently found out about a day trip opportunity about an hour west of us near Schulenburg, TX (also not far from Shiner, TX) that has some beautiful turn of the century Churches that are just breath-taking.  They are Catholic churches built by Czech and German immigrants and rival some of the European churches I have seen and so close to home!  We decided to go on Memorial Day since we usually drive home to Oklahoma for the holidays but didn't this year.  Below are the pictures from the 1st one we went to in Dubina, TX. 

It is Saints Cyril and Methodius Catholic Church - evidently there are a lot of Czech churches that celebrate Saints Cyril and Methodius! 


It was built in 1912 (rebuilt on the same site several times) and has more than 3,000 gold leaf stars on the ceiling. 


It also has colorful angels and vines and flowers throughout.  "All of the church’s interior paintings were covered with solid white paint in 1952, but their existence was never forgotten and faint traces remained visible. After over thirty years, the church’s parishioners decided to uncover and restore the paintings in 1983. Thus began a long and tedious restoration process, undertaken each Sunday after church services by the parishioners themselves. They carefully removed the white paint to reveal portions of the paintings. New stencils were made from each original pattern, and the freehand paintings were documented as thoroughly as possible. With the aid of historic photographs, the parishioners then repainted all of the interior decorations in their original locations. Although the recreated paintings lack historic integrity in terms of materials and workmanship, historic photographs reveal the historical accuracy of their design and arrangement." from www.fayettecountryhistory.org.


All the "Painted Churches" are free, but have a donation box to help with the upkeep.  This church was most recently restored in the 1980's by the parishioners as mentioned above.  This church can only be viewed from the entryway unless you are with a tour but it is still worth the trip.  Here is some detail work in the entry way. 


All the churches had nearby cemeteries and outdoors Meeting areas where many were have Memorial Day Picnics.  It was a beautiful day and a beautiful drive in Hill Country.  There were still a few wildflowers but most of the bluebonnets were gone.  I would encourage everyone to drive to Fayette County to see these stunning treasures, so many times we think of Eastern Cities or Europe, etc. as having cultural architecture or art but here it is and in Texas! 

PS - we found out about these from the Texas Highways magazine.

I have a co-worker whose wife is expecting a boy and their nursery theme is Jungle, so I found this darling pattern, Swimming Hippo Lovey and crocheted it over the weekend.  Too Cute! 

I used Caron Simply Soft for the everything but the swim ring, that is made with Berroco Comfort DK so it is all washable and I used 8mm safety eyes.  I LOVE the fish in the water...I used C, E, and H hooks but my tension must be a bit tighter than the pattern-writer, so I had to add some extra rows onto the water to make the proportions look right.  It was very well written except it didn't have any instructions about when to add the stuffing, since this was made in a few pieces, that would have been "good to know".   The colors in the first 2 pictures are pretty true.  This could be made in a day easily.  I hope the baby will like his new Lovey!